How to add Agent Status Reasons

Introduction

This article describes the processes for adding a new agent status reason in the Users and Teams section of the Premier Contact Point administration module.

Background

While logged into agent desktop agents use status reasons to control their availability. When a user changes status, the various status reasons are captured along with their duration. Changes of status are reflected on real time dashboards and captured for historical reporting purposes.

Status reasons are sorted into five different categories

  • Break Reasons – agents can select these reasons in the agent desktop on commencement of the Break status.
  • Ready Reasons – when ready reasons are enabled for a ready profile, agents can select these reasons on commencement of the Ready status.
  • Auxiliary Work Reasons – agents can select these reasons in the agent desktop on commencement of the Aux status.
  • Requeue Reasons – when accept requeue settings are enabled for the agent, these reasons are selected when requeuing the contact.
  • Disconnect / Logout Reasons – agents can select these reasons in the agent desktop when ending their session using the Disconnect button.

How to add a Break Reason

  1. Select Users and Teams from the Administration menu panel.
  2. Navigate to the Groups tab, click on Default from the list and then click edit.
    nJPBjJW0AAAAASUVORK5CYII=
  3. Select Status Reasons from the Users and Teams menu panel.
  4. Select the Break Reasons category tab and click add.
  5. Add the new status reason and description (optional) in the pop-up window.
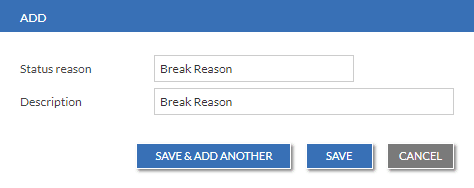
    Pasted 35
  6. Click Save or Save & Add Another.

Other status reasons can be added, removed and changed by selecting the relevant category.

Status reasons are not mandatory. If no specific reasons are provided users will move directly into the relevant status without being required to select a reason.

How to set Wrap Timeout (Auto Wrap)

Introduction

This article describes the processes for applying a Wrap Timeout (also known as Auto Wrap) in the Queues section of the Premier Contact Point administration module.

Background

Once an agent completes a customer interaction, they are generally required to complete a contact outcome, also known as a disposition or wrap code. The contact outcome is selected from a preconfigured list of outcomes associated to the queue. Contact outcomes are used for reporting purposes to identify the outcome of the call handled by the agent, for example, General Enquiry, New Sale, Customer Follow Up.

In some cases where a contact outcome has not been submitted a Wrap Timeout to automatically transition the agent from Wrap back to Ready.

How to apply wrap timeout

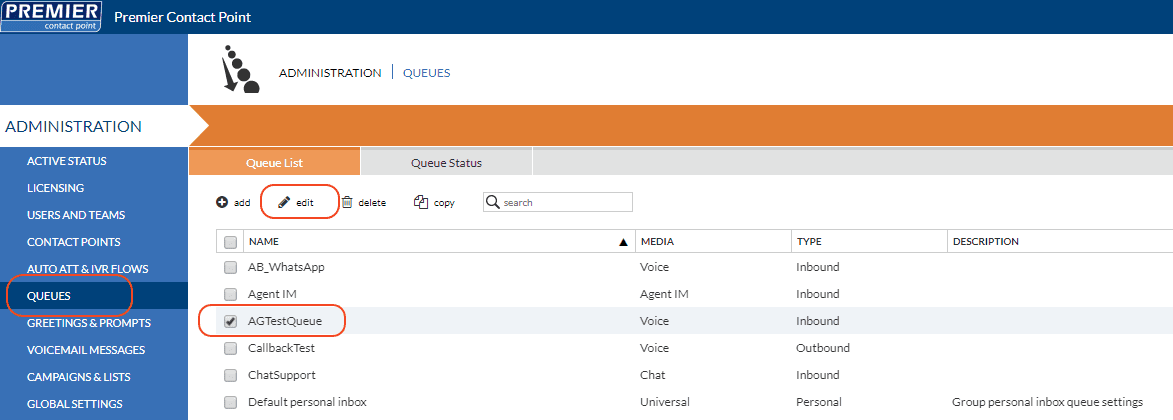
  1. Select Queues from the Administration menu panel.
  2. Navigate to the Queue List tab, select the queue that will be configured with wrap timeout, then click edit.
    h+Q2apJSA04dAAAAABJRU5ErkJggg==
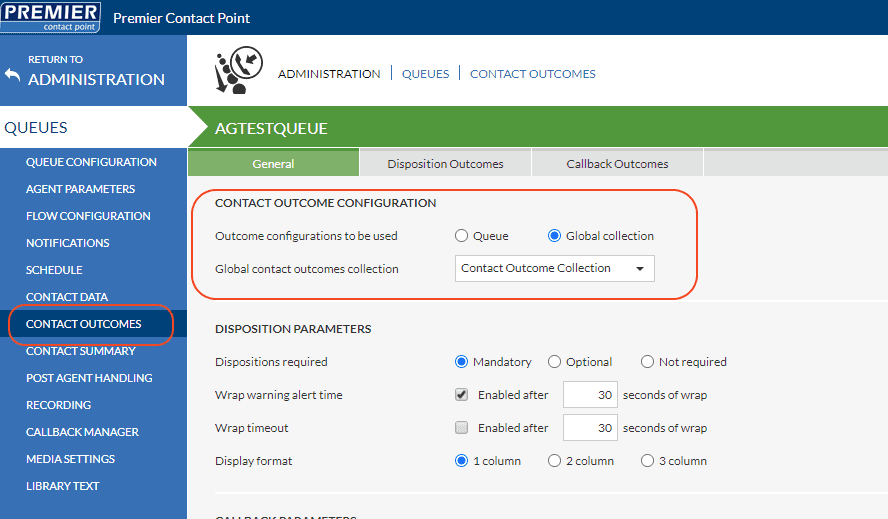
  3. Select Contact Outcomes from the menu panel and then navigate to the General tab.
  4. Select the Wrap timeout tick-box from the Disposition Parameters section and set the value in seconds, then click Save.

How to set Contact Outcomes

Introduction

This article describes the processes for creating a new contact outcomes collection in the global settings section of the Premier Contact Point administration module.

Background

Once an agent completes a customer interaction, they are generally required to complete a contact outcome, also known as a disposition or wrap code. The contact outcome is selected from a preconfigured list of outcomes associated to the queue. Contact outcomes are used for reporting purposes to identify the outcome of the call handled by the agent, for example, General Enquiry, New Sale, Customer Follow Up.

Contact outcome can be one of two types.

  • Disposition Outcomes – these outcomes will be available to select in the Disposition section after completing a call and are used to signify the call is completed and the type of call.
  • Callback Outcomes – these outcomes will be available to select in the Callback section after completing a call and are used to schedule a callback in the system.

Each queue can be assigned one contact outcome collection, the requirement for a contact outcome can be mandatory, optional or not required.
In addition, the system can be configured to automatically submit a disposition on the behalf of the agent after a preconfigured amount of time, also known as wrap timeout (auto wrap).

In this guide

  • Creating a new contact outcome collection
  • Adding entries to the contact outcome collection
  • Assigning contact outcome collections to a queue

Creating a new Contact Outcome Collection

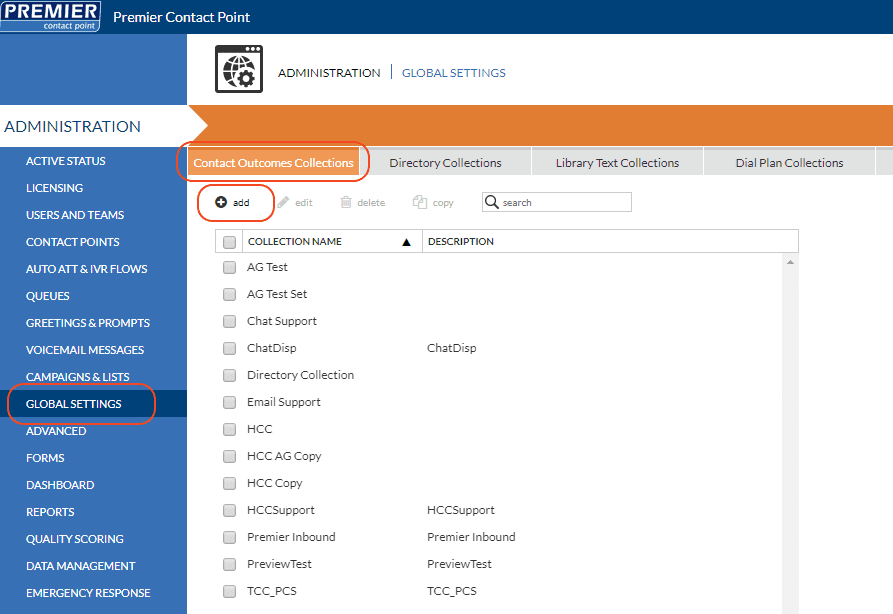
  1. Select Global Settings from the Administration menu panel.
  2. Navigate to the Contact Outcomes Collections tab, then click add.
    Pasted 27
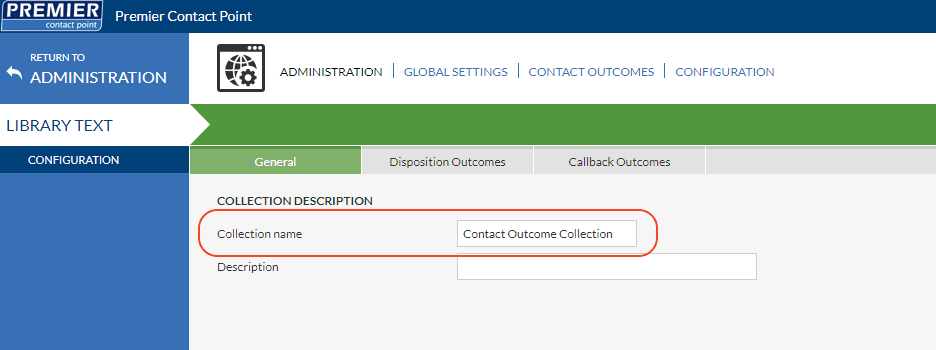
  3. Enter a Collection name and Description (optional), then click Save.
    Pasted 28

Adding entries to the Contact Outcomes Collection

Once a contact outcomes collection has been created, contact outcomes can be added.

  1. Select Global Settings from the Administration menu panel.
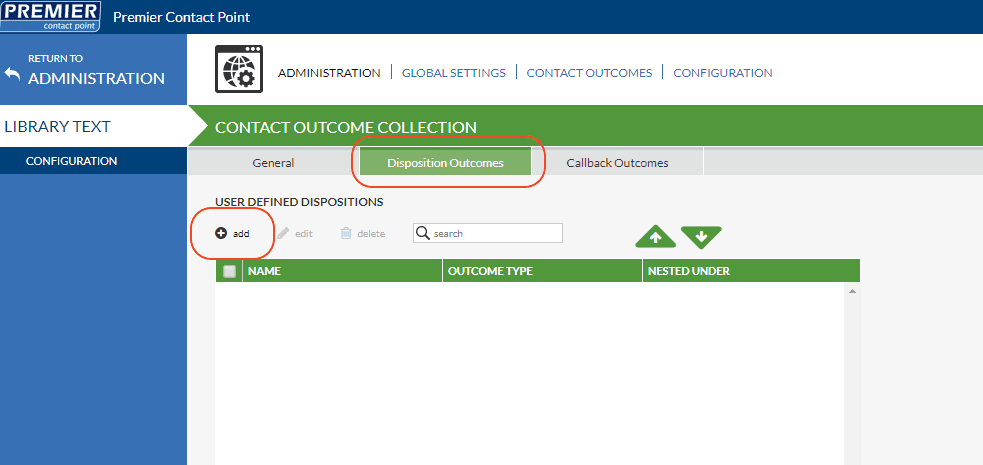
  2. Navigate to the Contact Outcomes Collections tab, select the collection name you just created and click edit.
  3. Navigate to the Disposition Outcomes tab, then click add.
    Pasted 29
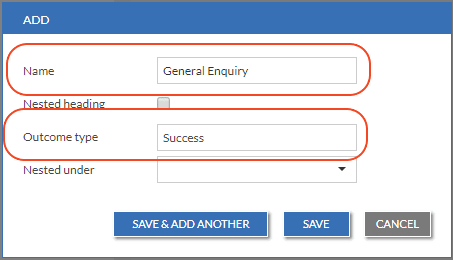
  4. Enter ‘General Enquiry’ in the Name field.
  5. In the Outcome type drop-down field select an outcome type, then click Save.
    Pasted 30
  6. Repeat for any additional required Disposition Outcomes by repeating Step 4 and Step 5

Add more entries as required, if multiple entries are required use the Save & Add Another option on the pop-up window to save time.

Callback Outcomes can be added to the contact outcomes collection by selecting the relevant tab.

Assigning Contact Outcome Collections to a queue

Once the contact outcomes collection has been created, it can then be assigned to a queue.

  1. Select Queues from the Administration menu panel.
  2. Navigate to the Queue List tab, select the queue, then click edit.
    Pasted 25
  3. Select Contact Outcomes from the menu panel and then navigate to the General tab.
  4. Select the Global Collection radio button from the Contact Outcome Configuration section.
  5. From the drop-down Global contact outcomes collection select the contact outcomes collection name you created, then click Save.
    Pasted 31
Any outcomes of existing Contact Outcome collections can be modified by selecting the contact outcome collection from the list and clicking the Edit button.


How to set Schedule Hours and Holidays

Introduction

This article describes the processes for setting Routine schedule hours and adding Holidays in the Contact Flows section of the Premier Contact Point Administration module.

Background

Each organisation will have a set of business hours during which their contact centre is staffed. When calls enter the Contact Flow, a schedule check is performed to route the call accordingly.

There are three possible routes a call can take after the schedule check is performed.

  • Business Hours
  • After Hours
  • Holiday

As business requirements change, it may be necessary to change schedule hours and add holidays to the calendar, to reflect when the contact centre will be open.

How to set Scheduled Hours

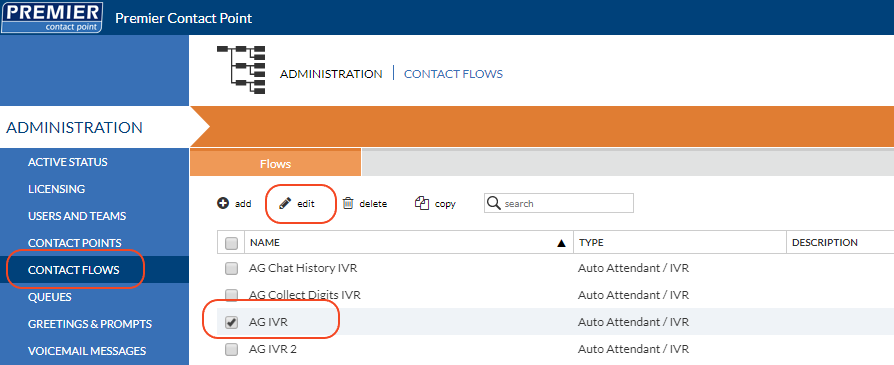
  1. Select Contact Flows from the Administration menu panel.
  2. Select the script that requires changing from the list and click edit.
    Pasted 54
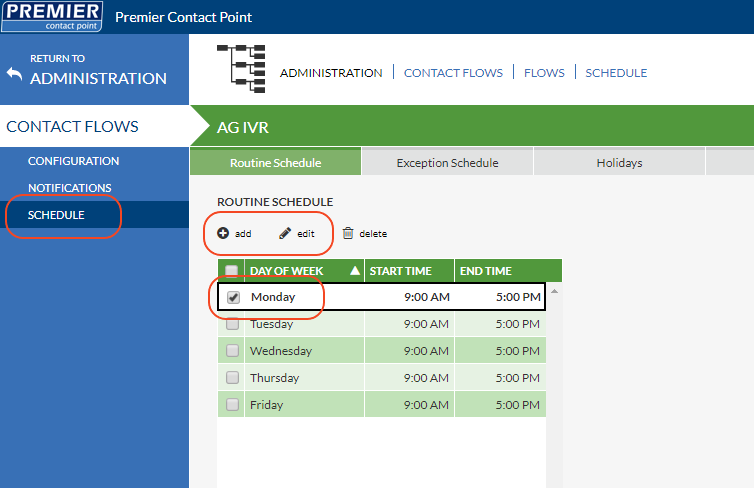
  3. Select Schedule from the Contact Flows menu panel.
  4. Navigate to the Routine Schedule tab and select an existing entry that needs to be changed and click edit OR click add and set the day, opening, and closing times in the pop-up editor.
    Pasted 55
  5. Click Save.
The Exception Schedule tab allows a single day to be entered where the operating hours of the contact centre may be extended / reduced without having to adjust the Routine schedule.

If an Exception Schedule entry is present it will override the Routine schedule.

Calls received outside the Routine Schedule hours are considered as after hours.


How to set a Holiday

  1. Select Contact Flows from the Administration menu panel.
  2. Select the script that requires changing from the list and click edit.
  3. Select Schedule from the Contact Flows menu panel.
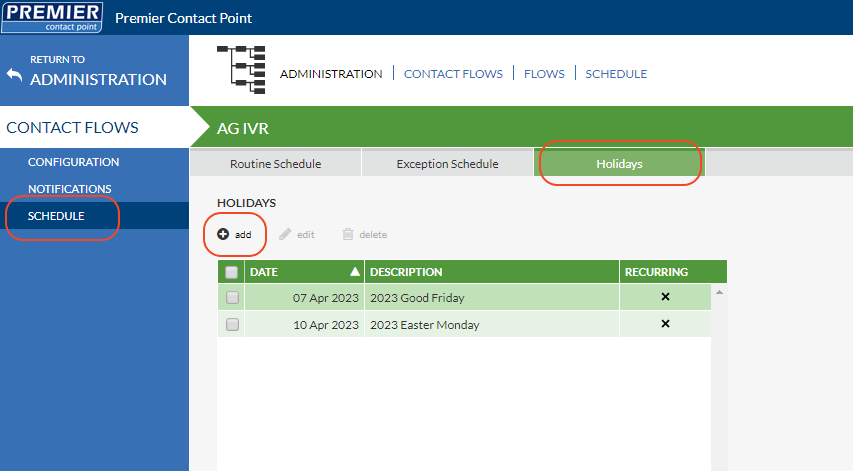
  4. Navigate to the Holidays tab and click add.
    Pasted 56
  5. Enter the holiday date and description in the pop-up editor.
  6. Click Save.


When adding a holiday, the holiday can be set to ‘recurring’ however using this option may not be appropriate when the recurring holiday falls on a weekend or a public holiday in lieu occurs on the next business day.
Holiday routing will apply for the entire 24-hour period of a date entered in the holiday schedule.

How to add audio prompts

Introduction

This article describes the processes for adding greetings in the Greetings & Prompts section of the Premier Contact Point Administration module.

Background

At times it may be necessary to add, change or download an audio prompt which can be used within Premier Contact Point. A non-exhaustive list of where prompts are used includes:

  • Auto Attendants and IVRs
  • Emergency Mode / Flash Notification
  • Voicemail
  • Post Call Surveys

Pre-recorded audio prompts must be in MP3 format, to record a prompt directly using the Greetings and Prompts interface, the user must have a microphone connected to their device.

How to add a prompt

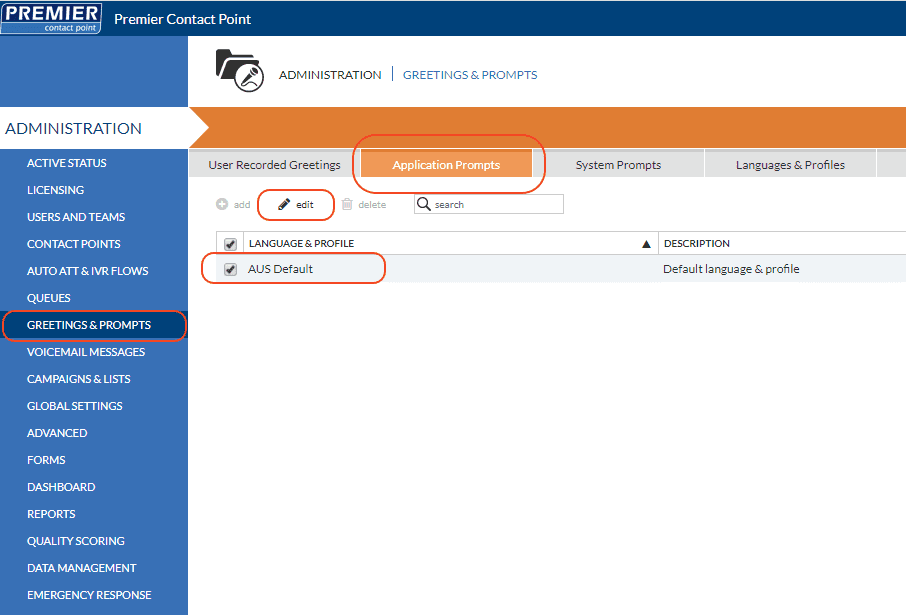
  1. Select Greetings & Prompts from the Administration menu panel.
  2. Navigate to the Application Prompts tab, select AUS Default from the list and click edit.
    Pasted 6
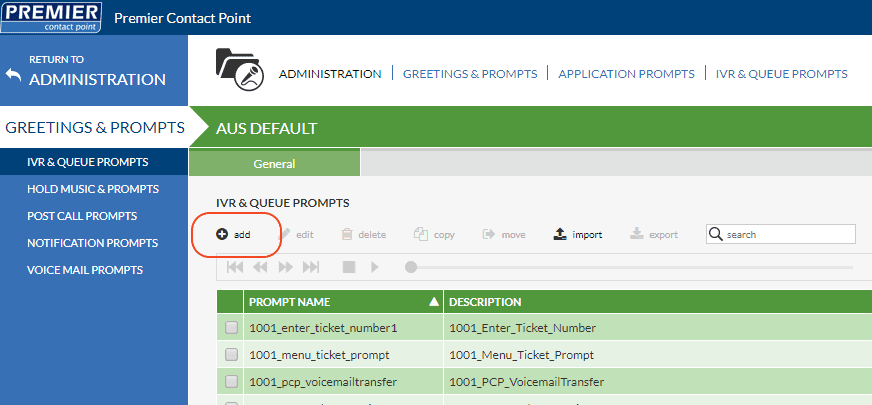
  3. A list of all available prompts will be displayed. Click add.
    Pasted 7
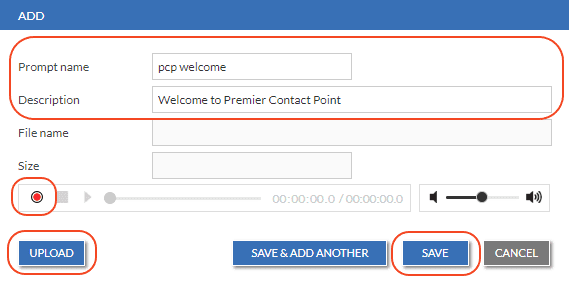
  4. In the pop-up editor enter the Prompt Name and Description.
    Pasted 8
  5. Click Upload to select a pre-recorded MP3 file OR click the Record button to record a prompt directly using a microphone connected to your device.
  6. Click Save or Save & Add Another (if you need to add more prompts)
Audio prompts are grouped by category (e.g. IVR & Queue Prompts, Notification Prompts). When adding a prompt to the system make sure it is added to the correct category.

If a prompt is added to the wrong category it can moved using the ‘move’ function in the toolbar.

How to apply Emergency mode

Introduction

This article describes the processes for enabling emergency / disaster mode in the Contact Flows section of the Premier Contact Point administration module.

Background

If the business experiences an emergency / disaster event, they may want to notify customers trying to contact them that they are unable to handle their call.

After hearing the message about the event, the customer may be provided with options to leave a message, have their call redirected to another location, or the call can be ended.

How to enable emergency / disaster mode

  1. Select Contact Flows from the Administration menu panel.
  2. Select the IVR to be set in emergency mode from the list of IVRs and click edit.
    Pasted 57
  3. Select Notifications from the Contact Flows menu panel.
  4. Click the Enable button to activate Emergency / Disaster mode.
  5. Select the appropriate message from the emergency notification message dropdown menu to play to callers while Emergency / Disaster mode is active.
  6. Click Save.
    Pasted 58

How to disable emergency / disaster mode

  1. To deactivate Emergency / Disaster mode, repeat Steps 1 to 3
  2. Click the Disable button to deactivate Emergency / Disaster mode.
  3. Click Save.
    Pasted 59
Before enabling Emergency / Disaster mode, the Administrator should be familiar with the call handling process that will be activated. To review your emergency / disaster routing, select configuration from the Contact Flows menu panel and click edit flows on the Production Copy to review the call flow.

Messages used for emergency mode must be stored in the Notification Prompts section located in the Greetings & Prompts section of the administration module.

For more information on uploading and recording prompts see the related article.


How to apply Flash Notification

Introduction

This article describes the processes for activating Flash Notification in the Contact Flows section of the Premier Contact Point Administration module.

Background

At times, the contact centre may receive a higher volume of calls than normal, due to an abnormal event.

Rather than having agents handle all these calls, the Administrator may want to play all callers a specific message relating to the event to reduce the number of calls that need to be handled by the agents.

Using Flash Notification, all callers can hear a pre-recorded message regarding the event, that may assist with reducing calls to agents.

How to apply Flash Notification

  1. Select Contact Flows from the Administration menu panel.
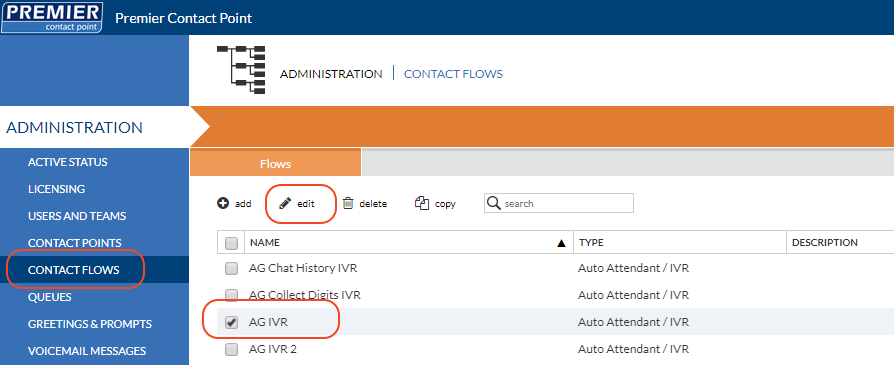
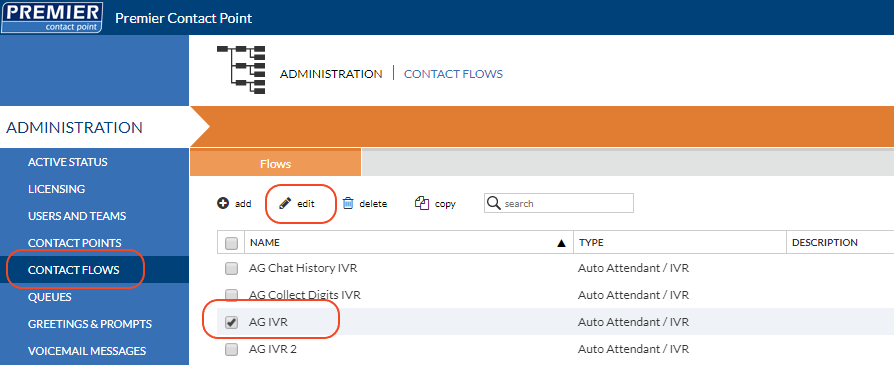
  2. Select the script you want to activate Flash Notification on and click edit.
    Pasted 60
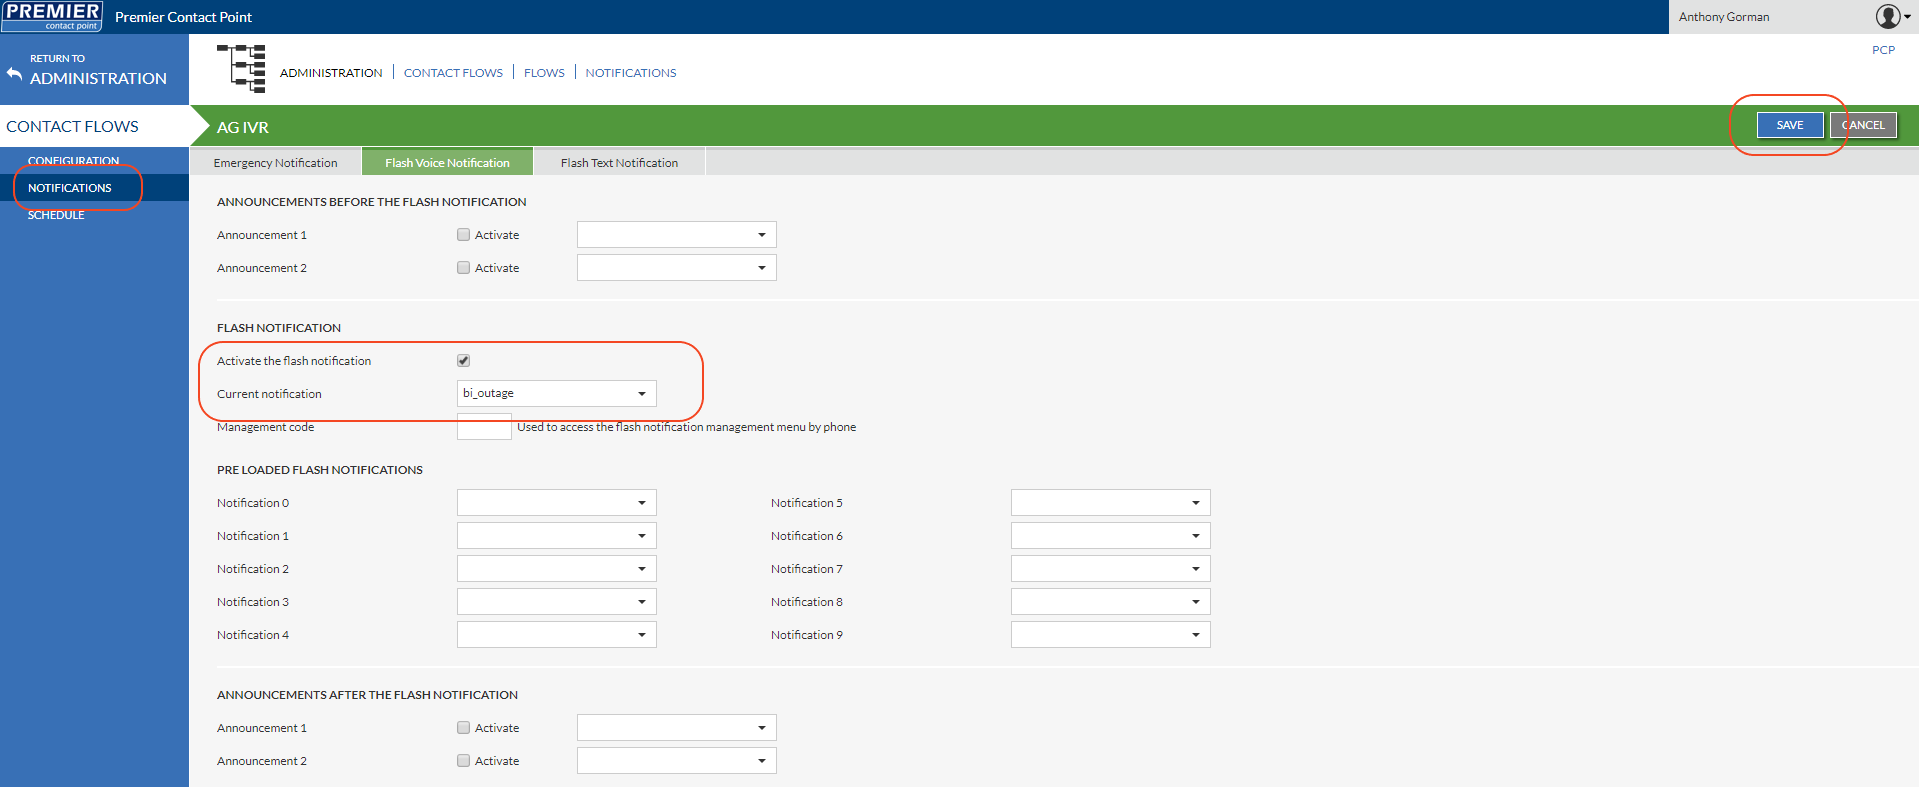
  3. Select Notifications from the Contact Flows menu panel.
  4. Navigate to the Flash Voice Notification tab.
  5. To activate flash notification, tick the Activate the flash notification tickbox.
  6. From the current notification dropdown, select the pre-recorded message to be played to customers.
    Pasted 61
  7. Click Save.
Before enabling flash notification mode, the Administrator should be familiar with the call flow process that will be activated.

To review the location of your flash notification message, select Configuration from the Contact Flows menu panel and click edit flows on the Production Copy
Only one flash notification module is allowed per script.

Messages used for flash notification must be stored in the notifications prompts section located in the Greetings & Prompts menu of the Administration module.


Deactivating Flash Notification

  1. To deactivate Flash Notification mode, repeat steps 1 to 4.
  2. Untick the Activate the flash notification tickbox.
  3. Click Save.


How to remove an Active session

Introduction

This article describes the processes for removing an agent session in the active status section of the Premier Contact Point administration module.

Background

At times it may be necessary to force logout an agent from Premier Contact Point as they have not logged out properly at the end of their shift.

How to remove a logged in agent

  1. Select Active Status from the Administration menu panel.
  2. Select the relevant user from the list and then click logout user.
    Pasted 53
  3. Click Logout on the confirmation window to force end the user’s session.
    Pasted 18
Removal of an active session is immediate, including if the agent is logged in and taking a call. Before logging out an agent check the Current Status and Status duration in the Active Status page.

Upmost care should be taken before removing a session.