How to create a new user account

Introduction

This article describes the processes for creating a new user account, available in the Users and Teams section of the Premier Contact Point Administration module.

Background

When a new employee who joins the company requires access to Premier Contact Point, they will require a new user account to log in.

Creating a new user account

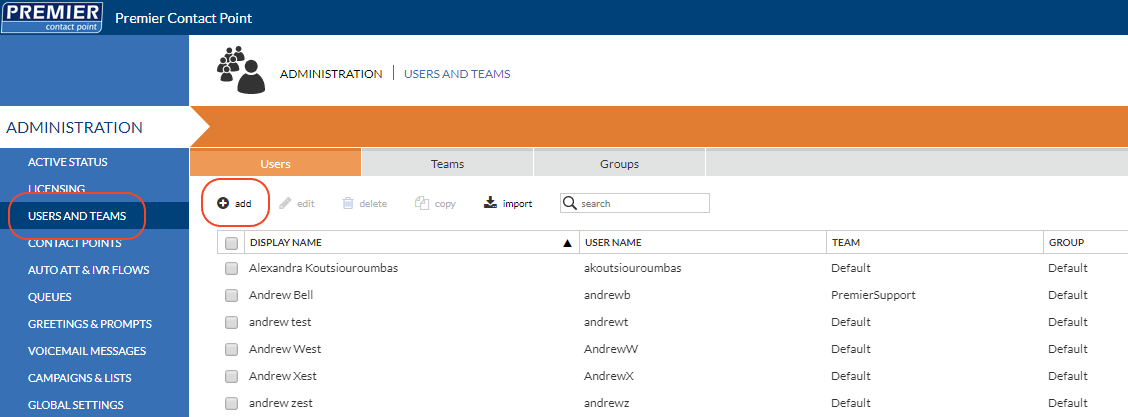
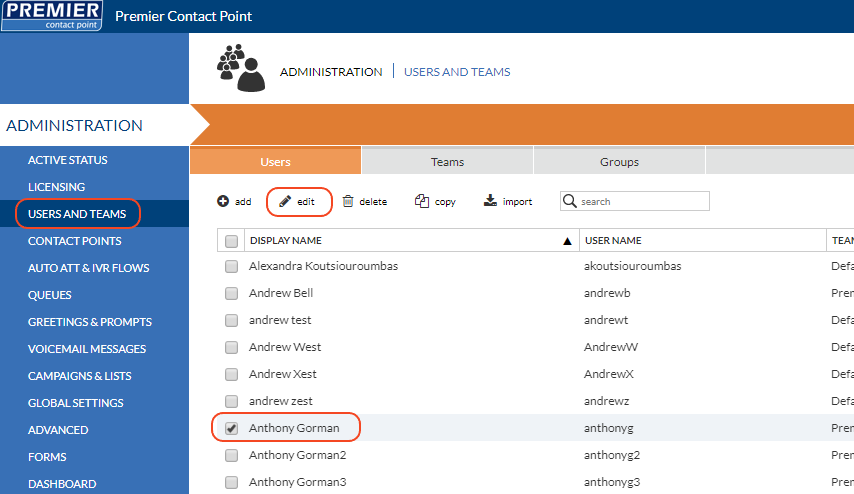
  1. Select Users and Teams from the Administration menu panel.
  2. Click Add.
    Pasted 10
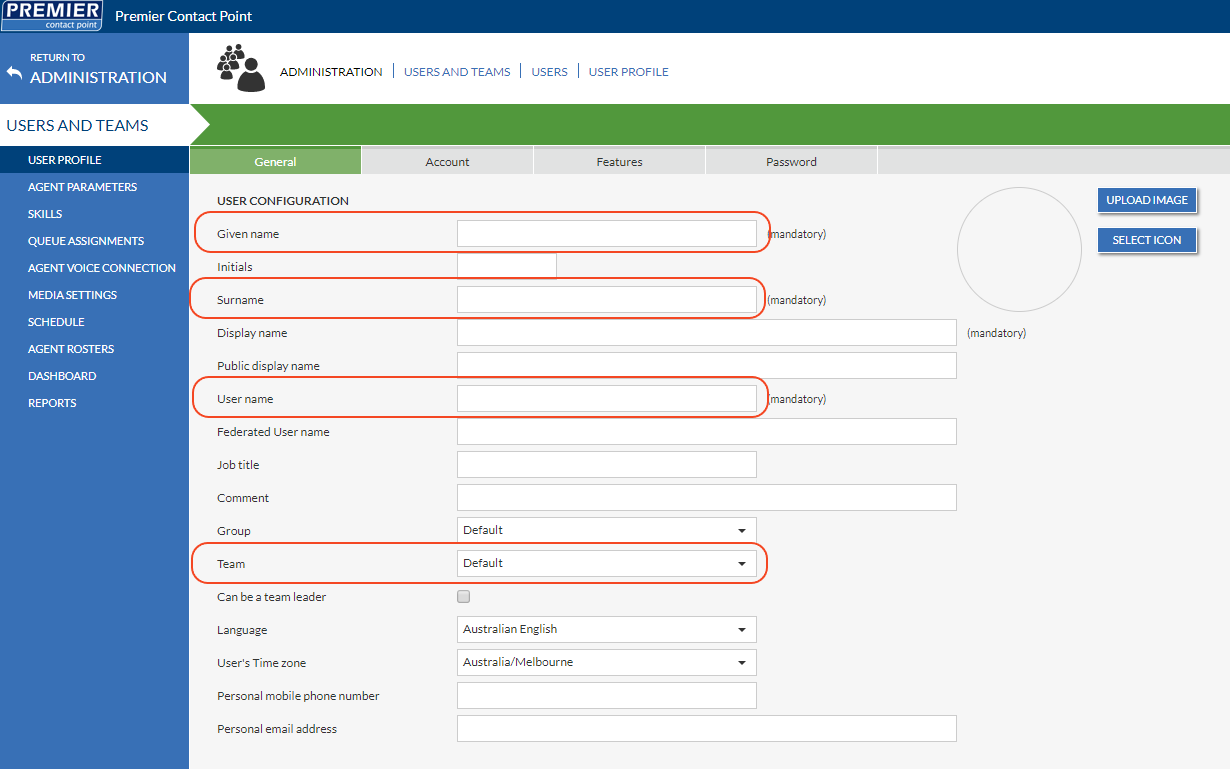
  3. Complete at minimum the following mandatory fields; Given Name, Surname and User name
  4. If single sign on is being used, complete the Federated User name field.
  5. Select a Team from the dropdown menu, then click Save.
    Pasted 11
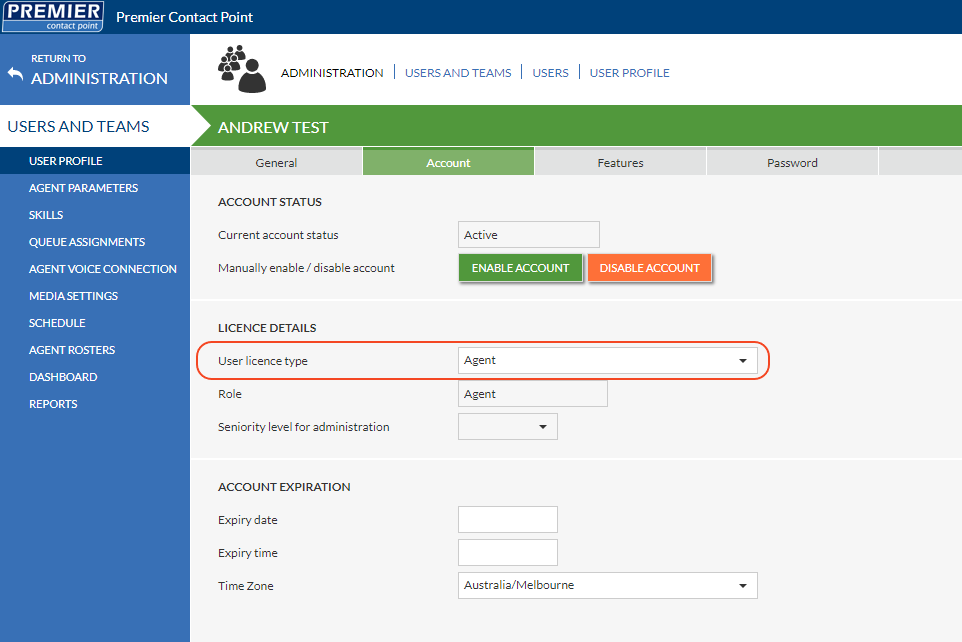
  6. Navigate to the Account tab and use the dropdown menu to select the User licence type, then click Save.
    Pasted 12
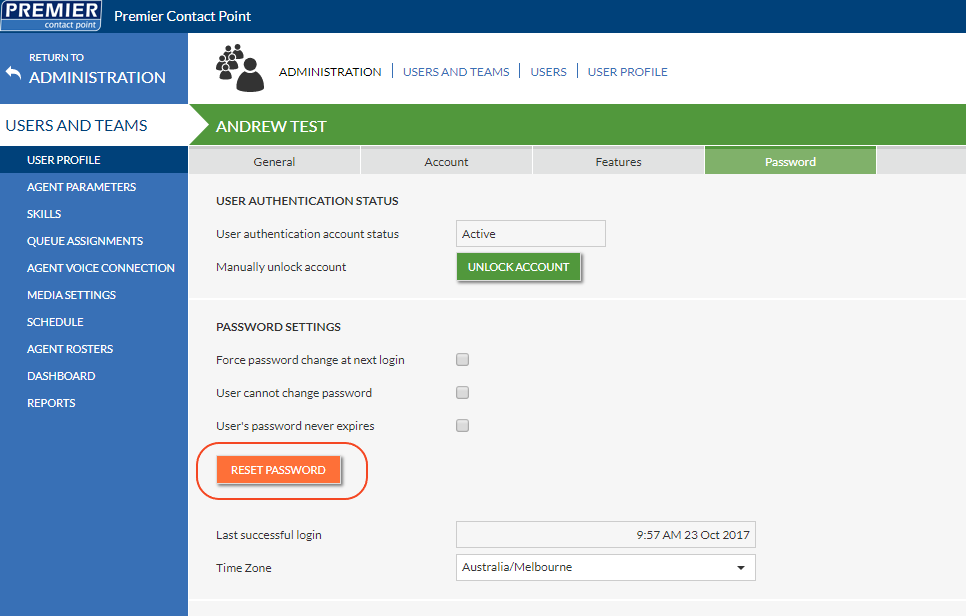
  7. Navigate to the Password tab and click the Reset Password button. (this step is not required if single sign on is being used)
  8. Enter the user password in the pop-up window then click Save.
    Pasted 13
Selecting an existing user and using the Copy button in the toolbar will automatically copy Team, User licence type and queue assignments to the new user account.


Skill Based Routing

Introduction

This article describes the processes for assigning and modifying skill levels to users via the users and teams section of the Premier Contact Point administration module.

Background

Skill-based routing is one type of call distribution that can be assigned to a queue. Where skill-based routing is enabled, the agent skill priority is assessed with a view to allocating the call to highest skilled agent available, even if they have been available less time than a lower skilled agent.

Where multiple agents are available with the same skill rating, the longest available agent will be selected as a second criteria.

How to assign a skill and rating to a user

  1. Select Users and Teams from the Administration menu panel.
  2. Select the user you want to assign the skill to and click Edit.
    Pasted 7
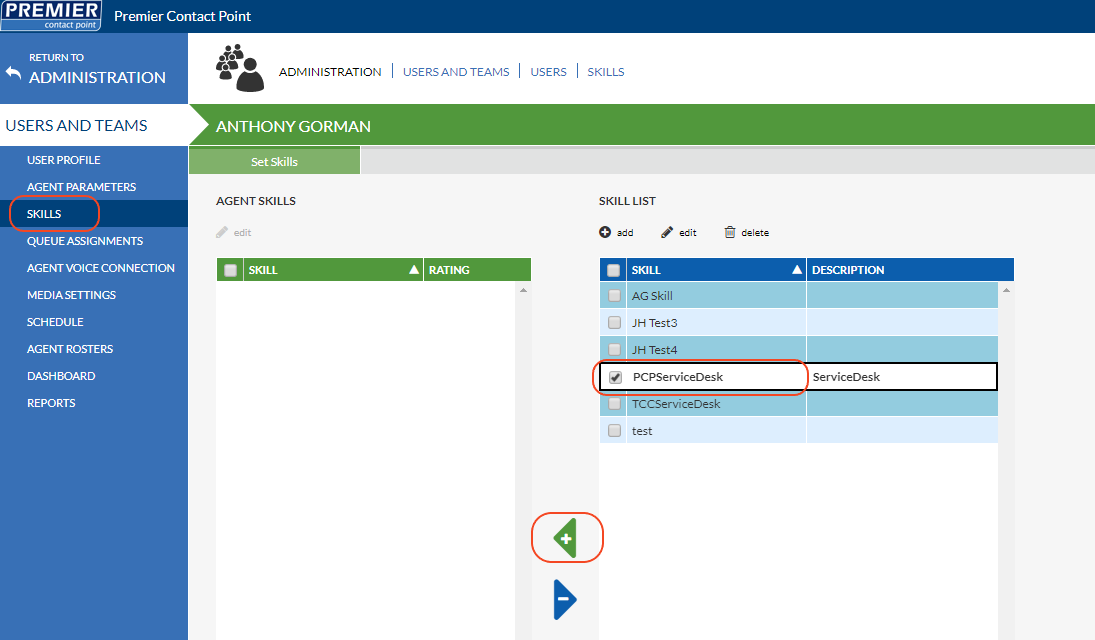
  3. Select Skills from the Users and Teams menu panel.
  4. In the right-hand Skill List table select the skill/s to be assigned to the agent.
  5. Click the + button between the Skills List and Agent Skills table.
    Pasted 8
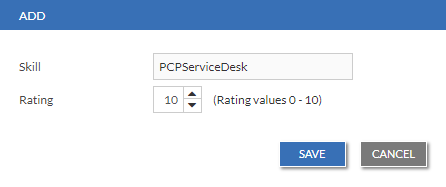
  6. In the pop-up window assign a rating between 0 and 10 (0 = lowest and 10 = highest) and then click Save.

Pasted 9

Skill ratings are assigned a value from 0 to 10, where 0 is the lowest priority and 10 is the highest priority.

More than one skill can be assigned to / removed from the user at a time.


Ready Profiles

Introduction

This article describes the processes for enabling Ready Profiles within the administration module of the Premier Contact Point platform.

Background

The Premier Contact Point platform allows agents to have up to ten Ready profile configurations, selectable by the agent status button on the Agent Desktop.

With multiple Ready Profiles available, agents can quickly and easily change their queue allocations to assist in calls they may always not necessarily handle.


For example, on their standard Ready Profile an agent may take calls from Queue A and Queue B, however on the weekend the agent is also required to take calls from Queue C.

An additional Ready Profile can be configured which gives the agent access to Queue A, Queue B and Queue C.

Additional configuration items allow the administration to

  • Give the profile a custom name that appears on the agent status panel.
  • Set whether the agent can receive transferred calls while using the Ready profile.
  • Set whether the agent needs to specify a Ready reason to access the profile.

How to add a new Ready profile

  1. Select Users and Teams from the Administration menu panel.
  2. Navigate to the Group tab, then select Default and click Edit.
    lGAAAAAASUVORK5CYII=
  3. Select Agent Parameters from the Administration menu panel
  4. In the group ready state profiles section enable the next available ready state profile by clicking the tick box.
  5. Enter the profile details
  • Name – this will be the profile name that appears on agent desktop and dashboards.
  • Available for agent transfers – if agents are allowed to received transferred calls while using this profile, tick the box.
  • Require ready reason – if agents are required to specify a ready reason to access this profile, tick the box.

wetBqaU8ntkRQAAAABJRU5ErkJggg==

6. Click Save.

Any users residing in the default group will now see the newly enabled ready profile from their next login to agent desktop.

Once additional ready profiles are configured agents need to be assigned to queues that they will receive calls from while using the profile.

Ready state profiles can also be deployed at Team and Personal level.

How to assign agents to queues

Introduction

This article describes the processes for assigning agents to queues in the queues section of the Premier Contact Point administration module.

Background

For an agent to answer inbound calls and make outbound calls they need to be assigned to queues.

Assigning users to a queue

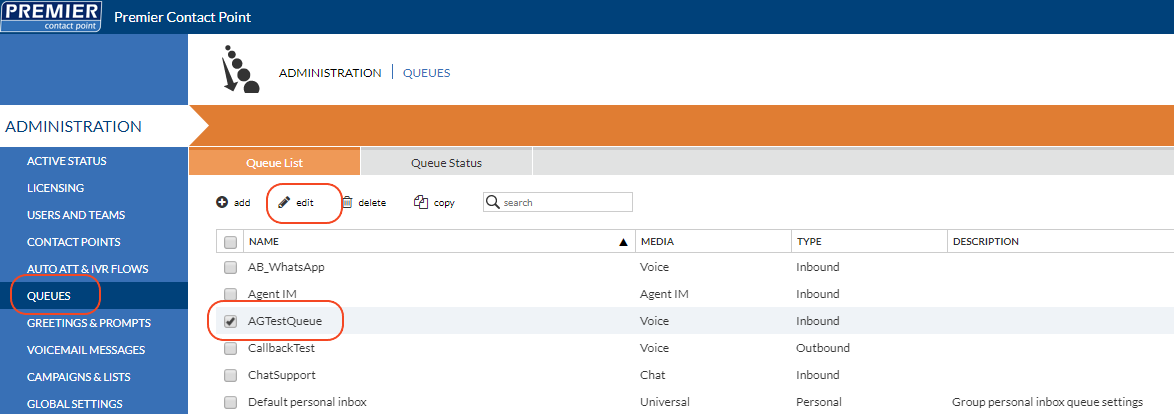
  1. Select Queues from the Administration menu panel.
  2. Select the queue you want to assign the user to and click Edit.
    Pasted 1
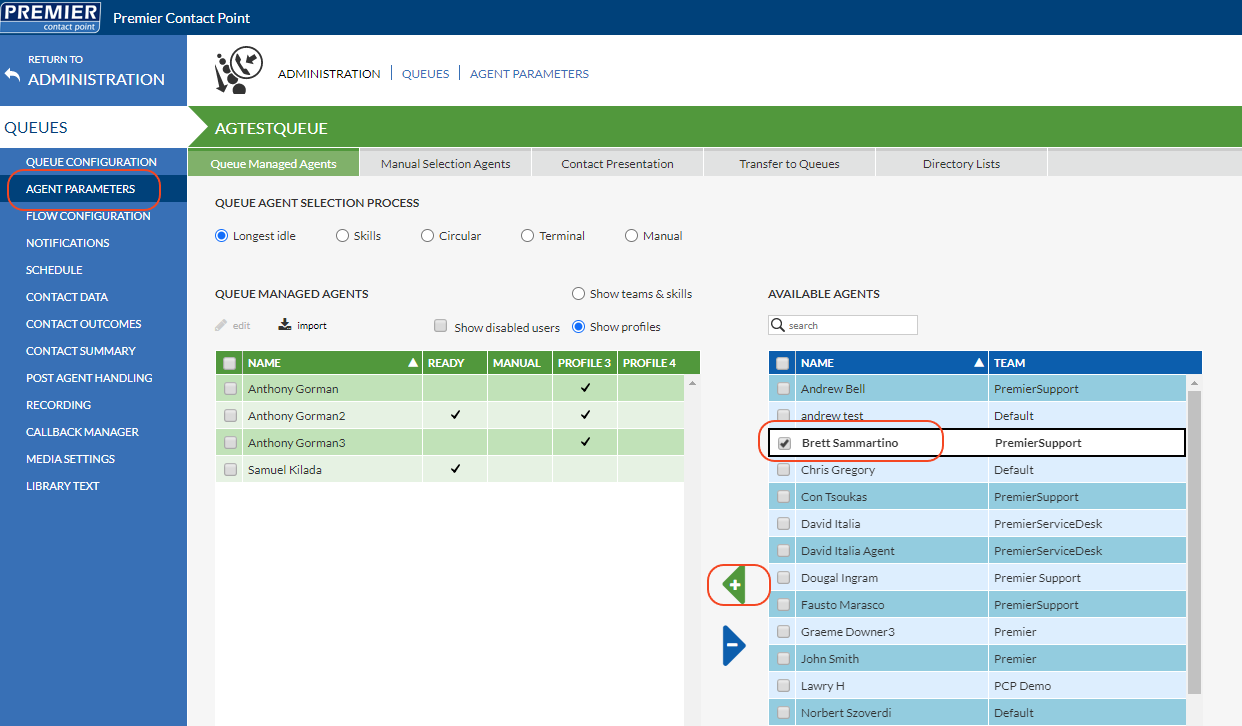
  3. Select Agent Parameters from the Queues menu panel.
  4. Select the agent/s to be assigned to the queue from the blue available agents table.
  5. Click the + button between the green queue managed agents table and blue available agents table.
  6. Click Save.

Pasted 2

By default the agent will be assigned to the queue on Ready Profile, indicated by the tick in the first profile column.

Where additional ready profiles are in use are you need to assign the queue to a different profile.

Assigning the queue to additional ready profiles

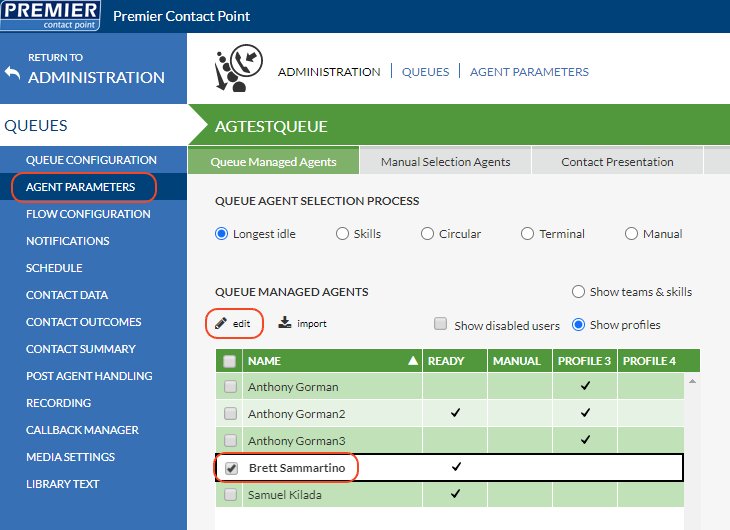
  1. Select the agent from the green queue managed agents table and click Edit.
    Pasted 3
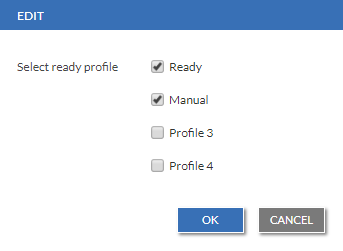
  2. Click the required additional profiles in the pop-up window.
  3. Click OK.
  4. Click Save.

Pasted 4

More than one agent can be assigned or unassigned from a queue at a time.


Recording Manager Searching for Interactions

Introduction

This article demonstrates the search and commenting functions of the Recording Manager module of the Premier Contact Point platform.

Background

Users have configurable access to the Recording Manager module. This module is used to search and review interaction records, call recordings and agent scorecards.

The information in this article assumes the user is currently in the Recording Manager module.

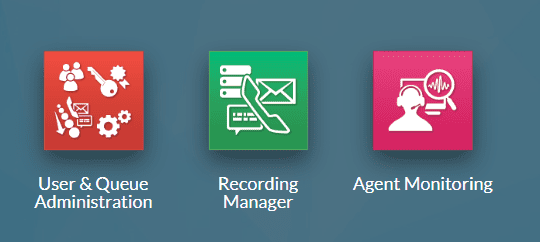
The Recording Manager module is accessible via the Premier Contact Point home screen in the Administration section to authorised users.
Pasted 46

Pasted 52

Searching for Interactions

Preset Queries

Preset Queries are a collection of saved queries, enabling users to search for records quickly.

There are four categories of preset queries.

    • System Queries – These are default queries built into the Recording Manager module. A list of common search criteria has been pre-configured for you.
    • Group Queries – A user-defined category, visible to all members of your current group.
    • Team Queries – A user-defined category, visible to all members of your current team.
    • User Queries – A user-definite category, visible to only the current user.

To save a Preset Query

  1. Complete the search criteria, then click Add To Query followed by Add Preset.
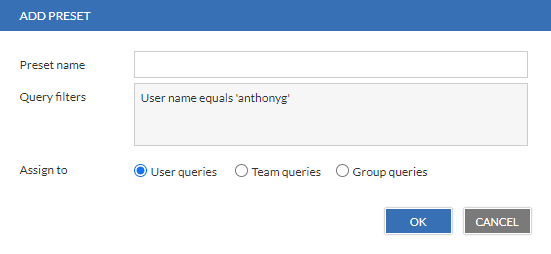
  2. Complete the Add Preset form and select the appropriate assignee category.
    Pasted
  3. Click OK to save your preset.

Ad-hoc Queries

These are queries which can be run as and when needed.
In this example, we will search for all calls received yesterday from a particular caller.

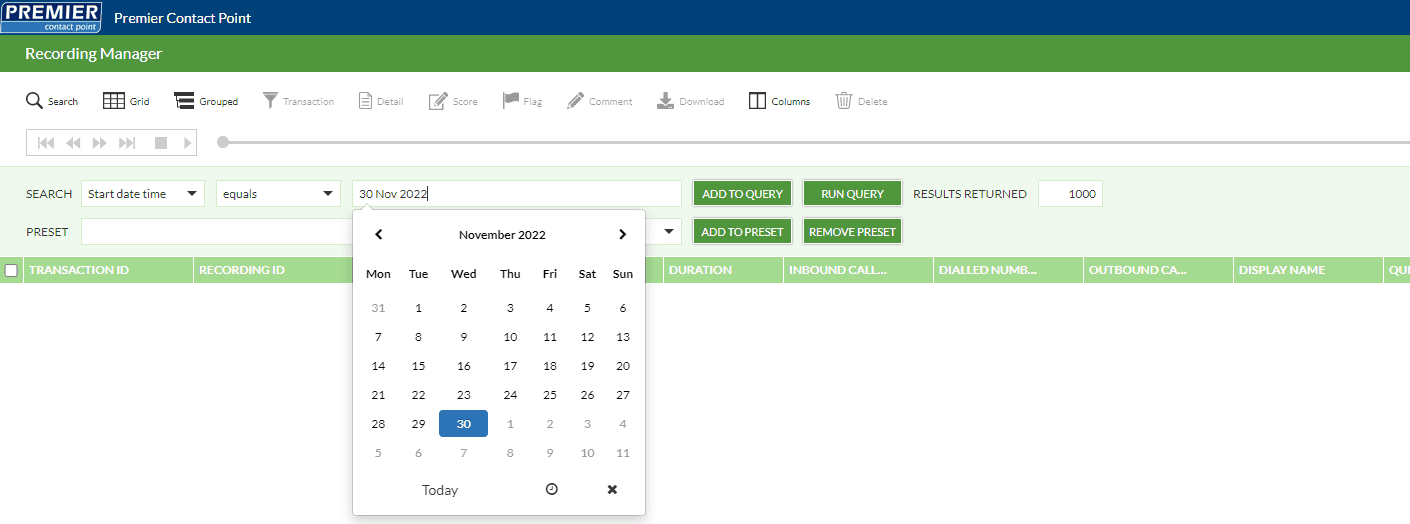
  1. Next to the Search label, select the drop down.
  2. Select Start date time from the list.
  3. In the operator column to the right, select equals.
  4. Click in the column to the right of the operator column, this is a date selector. Select yesterday’s date.
    Pasted 1
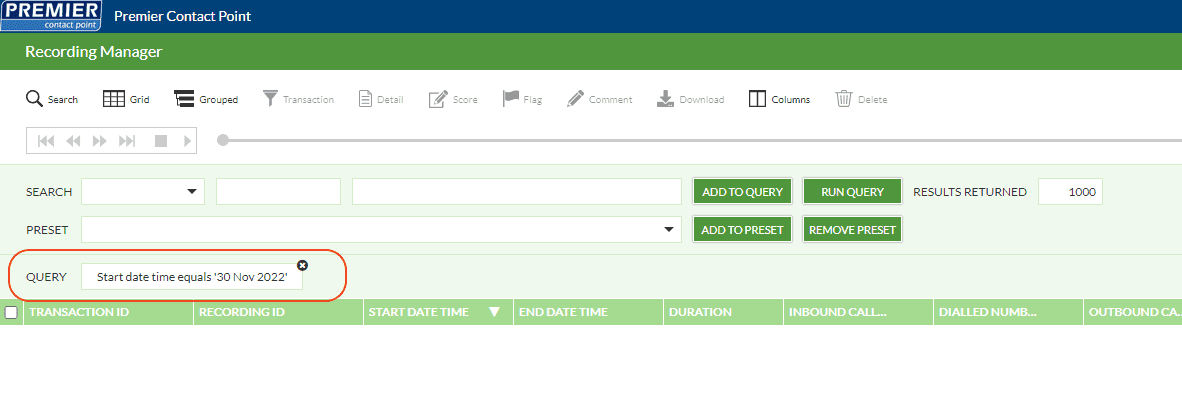
  5. Click Add To Query; your query should look like the below.
    Pasted 2
  6. Next, choose the Inbound caller id search criteria and select the equals operator.
  7. Type in the caller’s phone number, then click Add To Query followed by Run Query. Results for yesterday, from your specified inbound caller number, will now be displayed.

The Detail View

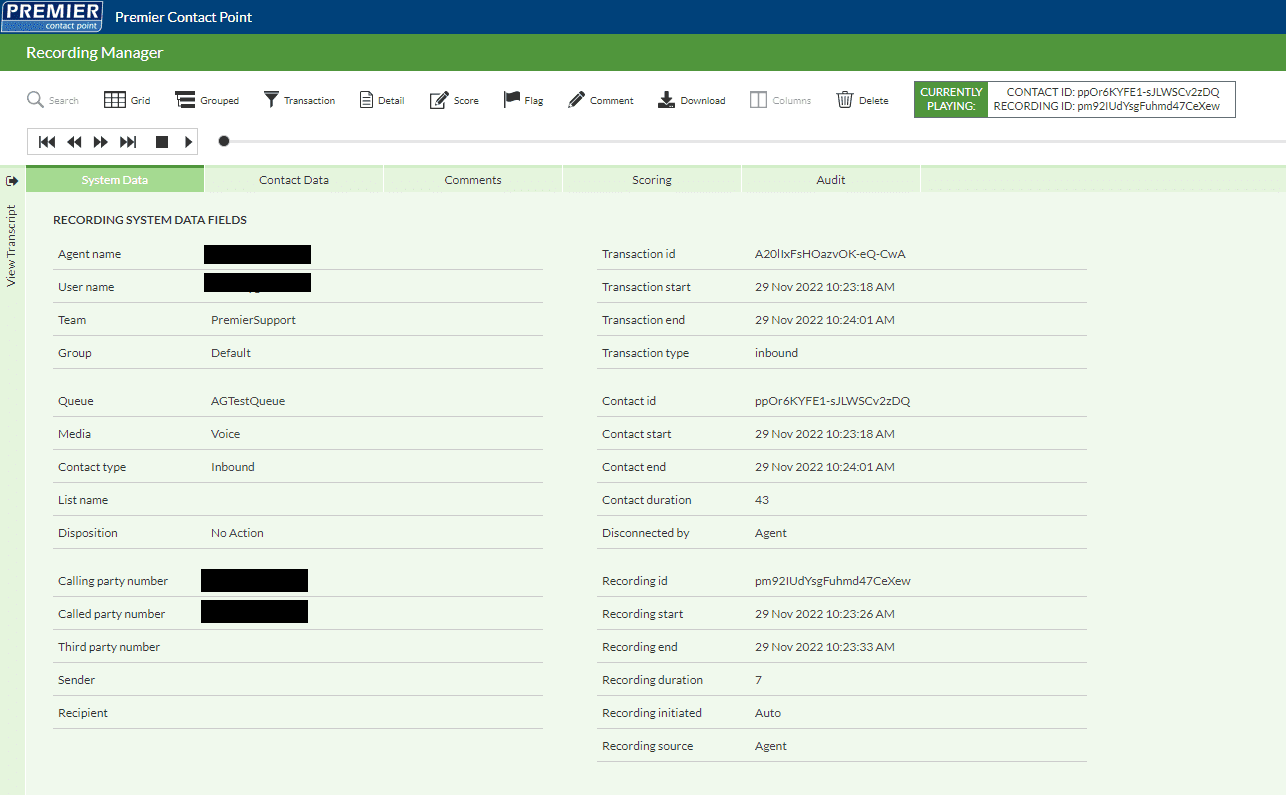
The Detail button on the main toolbar allows for additional information to be viewed about the contact.

Pasted 3

Each of the tabs is described in more detail below

System Data

Contact information available from the grid view is displayed in a form layout.

Contact Associated Data

If using the inbuilt database to store information about your callers, matched data will be recorded with the interaction and displayed here.

View Transcript

Text-based interactions generate a transcript log which is accessed by clicking the ‘View Transcript’ button.

Comments

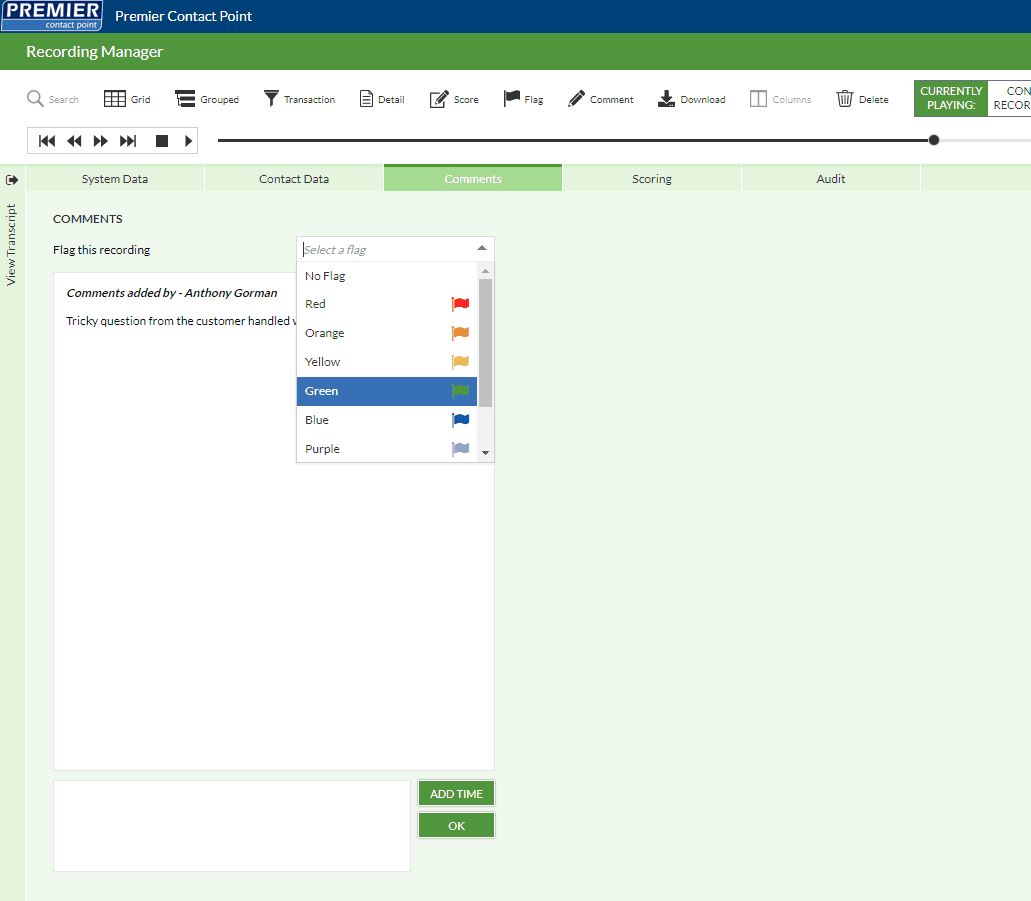
Leaving a comment can help you and your team discuss an interaction record. A couple of useful tools have been added to assist in identifying an interaction record for discussion.
Pasted 4

Comments by user

Comments are sorted by user; when a comment is left by a user, their name will be displayed as the comment header.

Flags

Assigning a flag will allow users to search for all interaction records that are assigned the relevant flag.

‘Add Time’ button

When commenting on a call recording, you can pin the relevant position in the audio file, providing a context reference for other users.

Scoring

Loads the Quality Assurance module allowing a preconfigured scorecard to be completed on the interaction, for more information on Scoring see the Quality Scoring article.

Audit

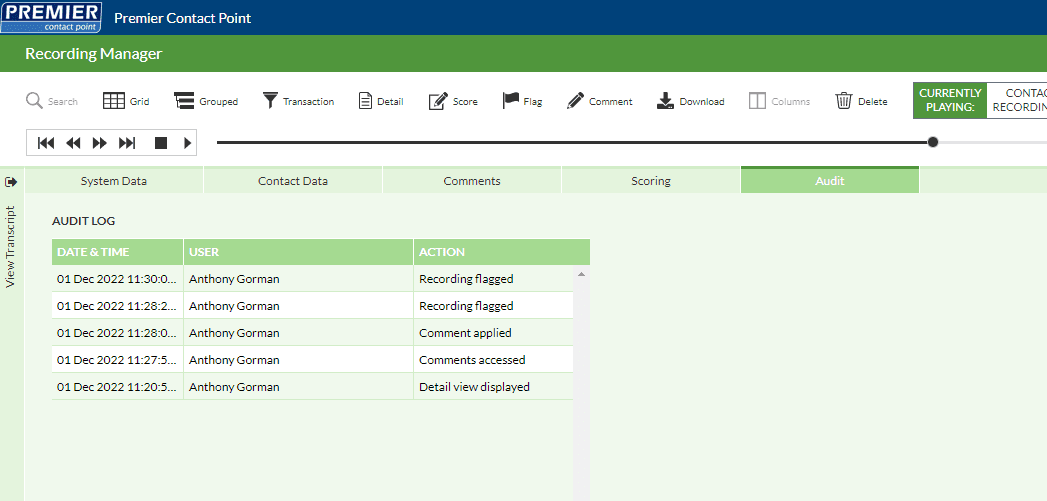
Interaction records in the Recording Manager module are audited; this audit will log the access and actions performed by a user.
Pasted 5


Recording Manager Overview

Introduction

This article demonstrates the general functions of the Recording Manager module of the Premier Contact Point platform.

Background

Users have configurable access to the Recording Manager module. This module is used to search and review interaction records, call recordings and agent scorecards.

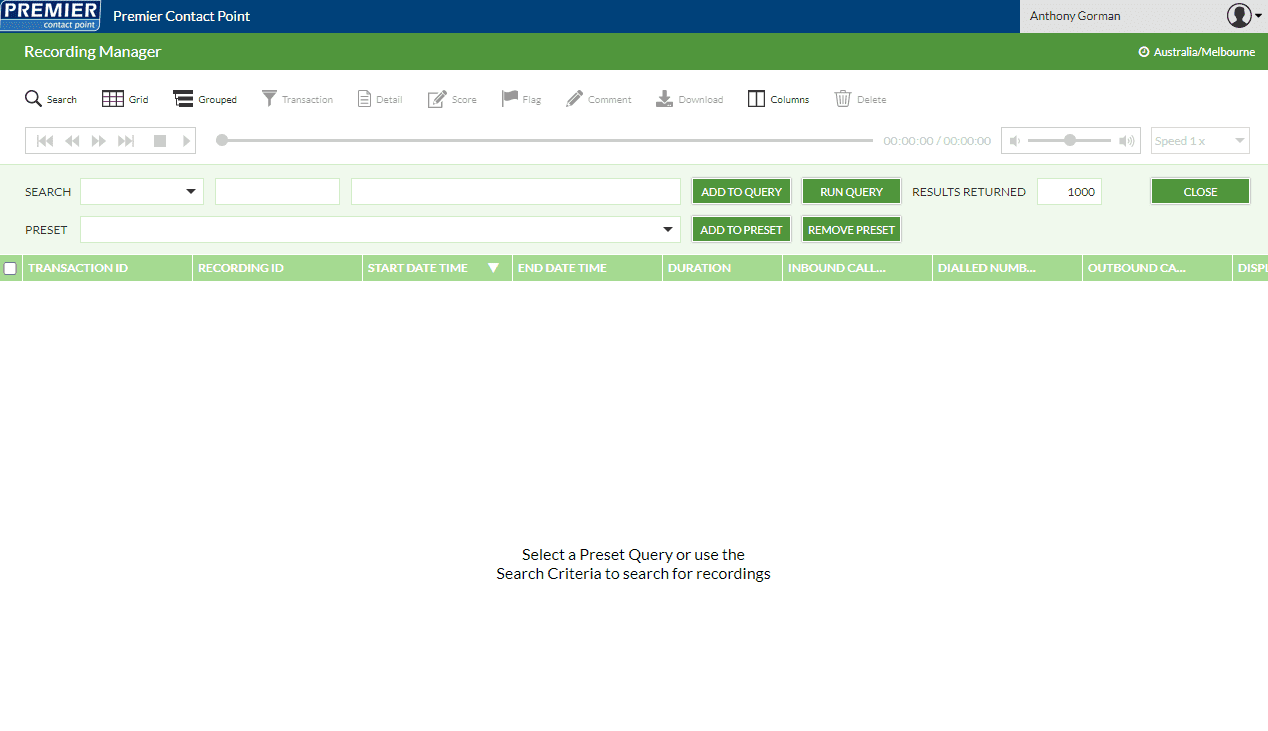
The Recording Manager module is accessible via the Premier Contact Point home screen in the Administration section to authorised users.
Pasted 46

Pasted 52

Display Elements

Main toolbar

The toolbar provides access to functions used with interaction records. Buttons which are greyed out are unavailable actions in context and fully lit buttons are available actions in context. Each element function is described in the table below.
Pasted 47

  • Search – Hides or shows the search toolbar.
  • Grid – When in another view, this button returns to the search grid.
  • Grouped – Displays the selected interactions within a transaction grouped together via Transaction ID.
  • Transaction – Displays the selected interaction transaction history (all interaction records related to the customer contact, e.g. a call which has been transferred multiple times).
  • Detail – Displays the detailed view for the selected interaction record.
  • Score – Displays the scorecard view for the selected interaction record.
  • Flag – Assigns a user-selected colour flag to the selected interaction record.
  • Comment – Assigns free text input by the user to the selected interaction record.
  • Download – Initiates an mp3 download of the selected call recording.
  • Columns – Displays the user-configurable search result grid options.
  • Delete – Deletes the interaction record and associated files e.g. call recordings for the selected interaction.

Search toolbar

The search toolbar allows users to use a preset or custom filter to search for interactions. Each element function is described in the table below.
Pasted 51

  • Search – Allows the user to specify, in order, which field to search in, the operator, and the value to search for.
  • Preset – Displays predefined or customer-created saved queries.
  • Query – Displays the constructed search query string which will be executed when ‘Run Query’ is clicked.
  • Run Query – Executes the selected preset query or constructed query filter.
  • Add To Query – Add the selected search query string into the query filter.
  • Clear – Clear the query filter only; search results from the previous executed query will remain.
  • Add To Preset – Save the current constructed query filter as a preset.
  • Remove Preset – Delete the selected query preset.
  • Close – closes the search toolbar, to re-open use the Search button in the main toolbar.

Search result grid

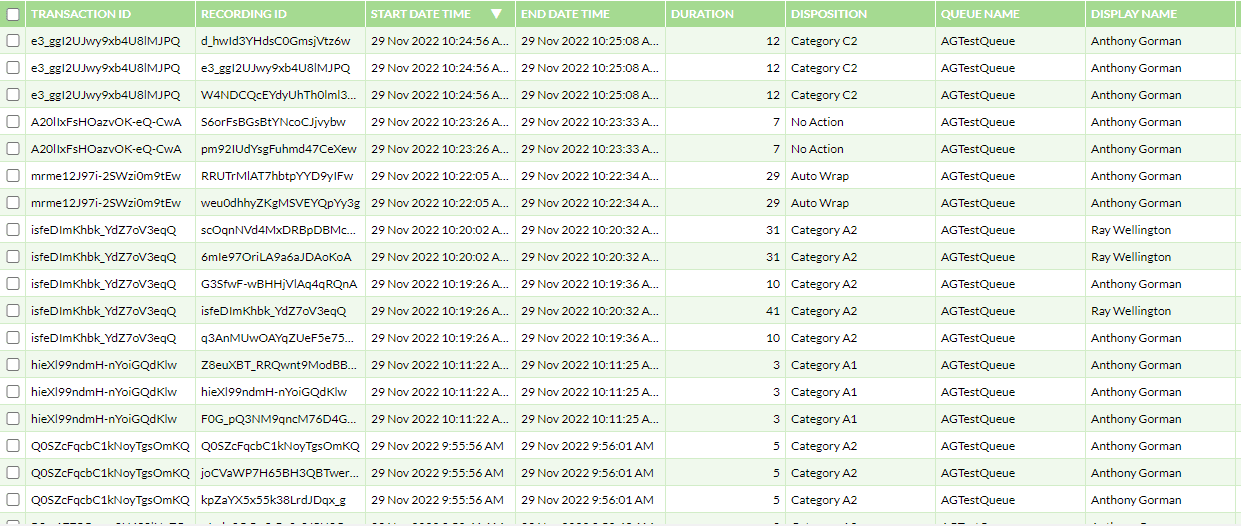
Displays the returned search results.

Pasted 50

How to enable Accept Requeue on a user profile

Introduction

This article describes the processes to enable Accept Requeue in conjunction with Direct Audio within the administration module of the Premier Contact Point platform.

Background

Agents connecting via Direct Audio are continuously connected to the platform meaning calls could drop in at any stage while they are available.

If agents require accept / requeue functionality for offered calls (like their phone ringing when connected via PSTN) the accept / requeue option must be configured.

With accept / requeue configured, agents are provided simulated ringtone via the computer when they are offered the call, to accept the call the agent must click accept within the configured response time.

Agents can set their preferred sound notification and number of notifications via their Agent Desktop Settings menu.

How to enable Accept Requeue on a user profile

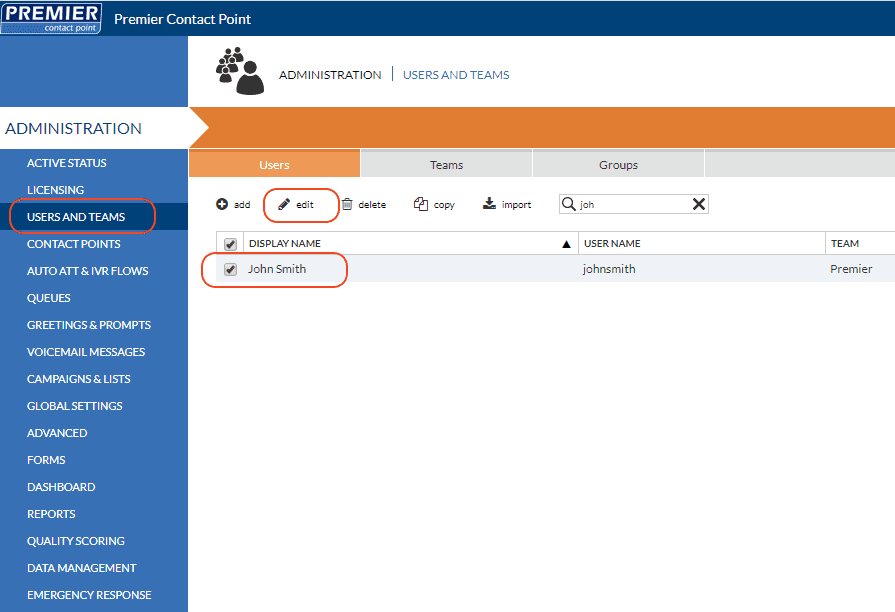
  1. Select Users and Teams from the Administration menu panel.
  2. Select the relevant user from the list and then click edit.
    Pasted 42
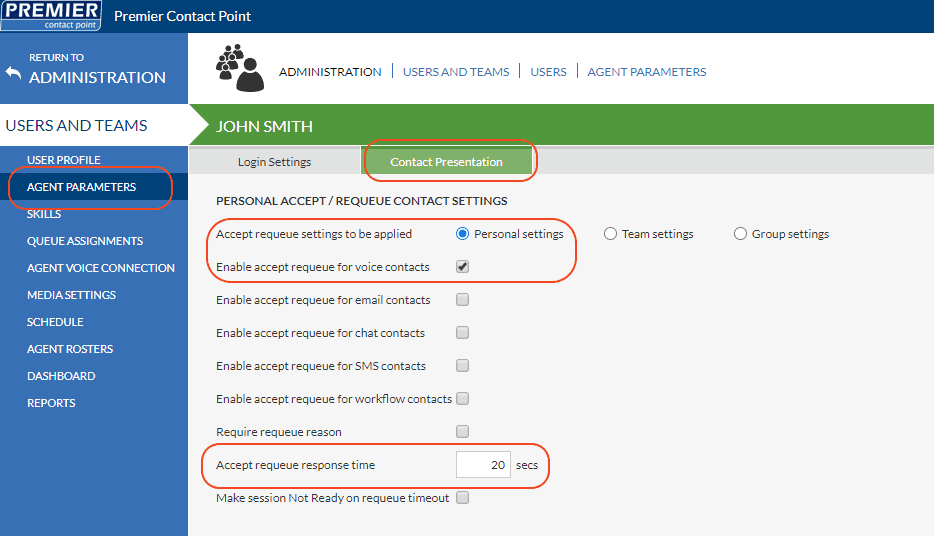
  3. Select Agent Parameters from the Users and Teams menu panel.
  4. Navigate to the Contact Presentation tab.
  5. Select the radio button for Personal settings and click the tick box for Enable accept requeue for voice contacts option.
  6. Set the preferred Accept requeue response time in seconds.
    Pasted 43
  7. Click Save.


Accept requeue settings can also be configured at Team and Group level. When configured at either a Team or Group level, set the agent profile to the relevant Team or Group setting.


Setting your preferred audio notification via the agent desktop

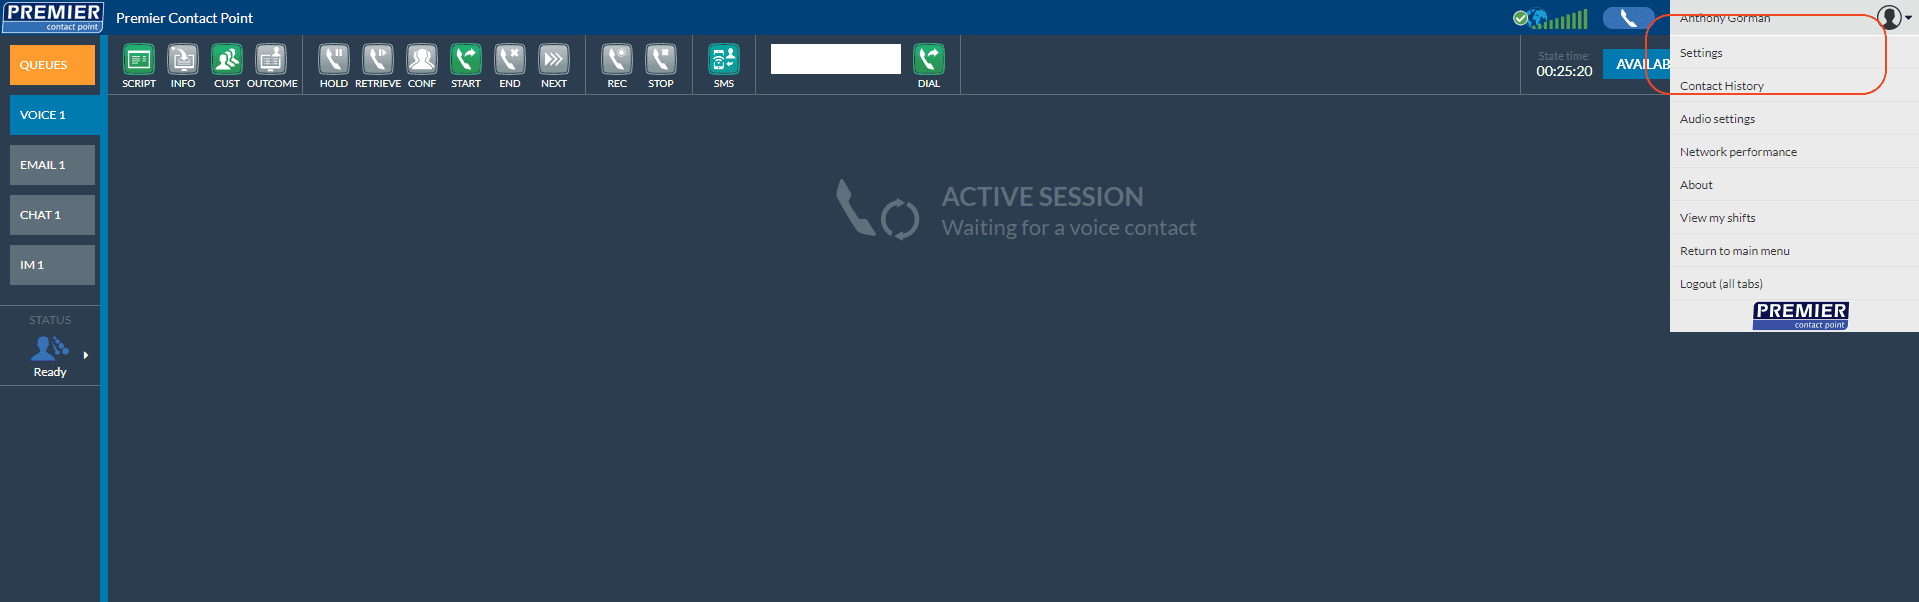
  1. Select Settings from your profile menu.
    Pasted 44
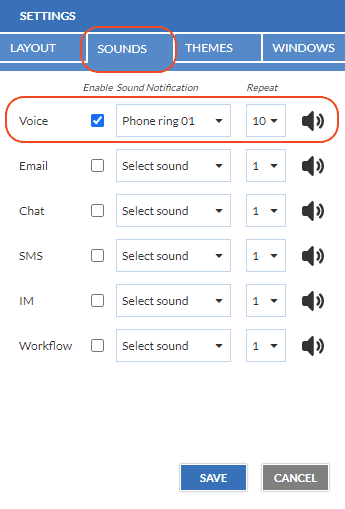
  2. Navigate to the Sounds tab.
  3. For the Voice section click to Enable, then set your preferred Sound Notification and number of Repeats.
    Pasted 45
  4. Click Save.
Use the speaker icon to test your sound notification.


How to enable Direct Audio on a user profile

Introduction

This article describes the processes to enable Direct Audio as a connection option for an agent within the administration module of the Premier Contact Point platform.

Background

Direct Audio (WebRTC) will allow agents to use the telephony features native to their browser, so that a landline connection is not required to connect the agent audio to the platform.

Once Direct Audio has been enabled against the agent profile, the agent will be able to select this as a connection type at logon.

How to enable Direct Audio connections for a user

  1. Select Users and Teams from the Administration menu panel.
  2. Select the relevant user from the list and then click edit.
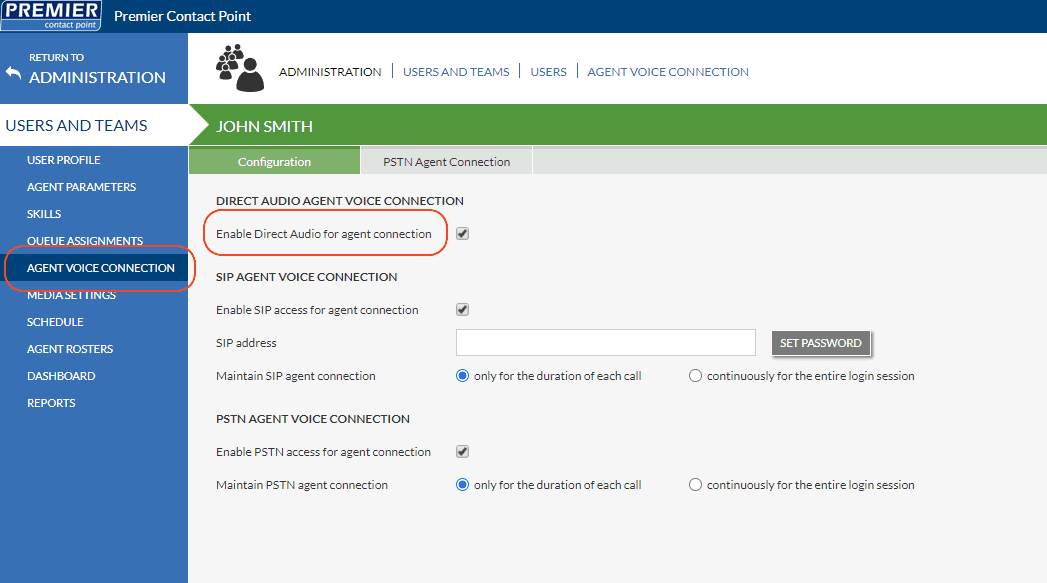
  3. Select Agent Voice Connection from the Users and Teams menu panel.
  4. Click the tick box for Enable Direct Audio for agent connection then click Save.
    Pasted 41

Connecting with Direct Audio in the Contact Manger / Agent Desktop

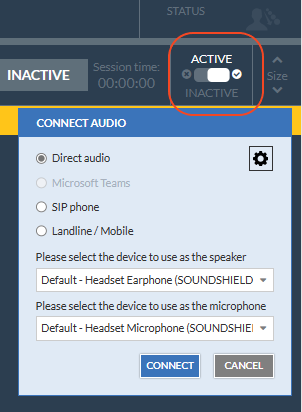
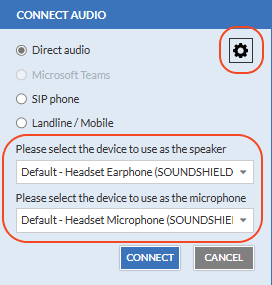
Activate the Contact Manager / Agent Desktop session to display the Connect Audio pop-up window.

image 1

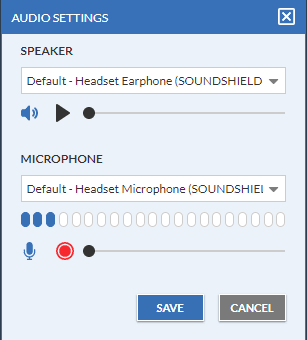
Use the drop-down menus to select the preferred speaker and microphone device. Users can access the Audio Settings to test the device, by clicking the highlighted gear icon.
image Pasted 37

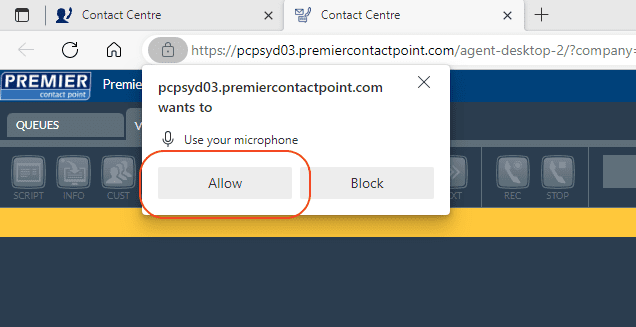
An agent connecting for the first time will need to provide consent for the web browser to use the microphone. After clicking the Connect button, click the Allow button on the browser pop up.
Pasted 38

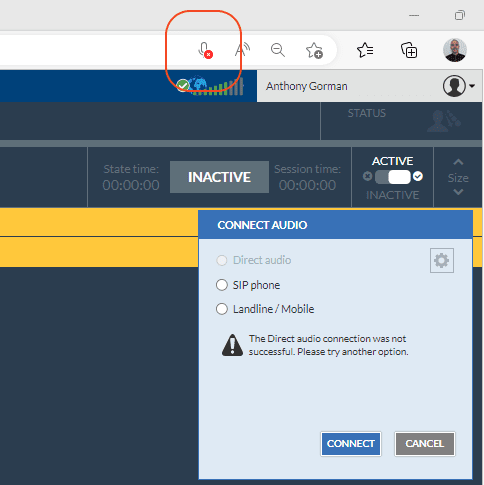
Users who block the request will not be able to connect with Direct Audio. The browser will indicate that the attempt to use the microphone is being blocked. Clicking on the microphone symbol with the red cross will allow the user to enable the microphone.

Pasted 39

The pop-up window to provide consent to access the microphone may vary between web browsers. In all cases, the ‘allow’ or ‘allow always’ option should be selected.

Agents connecting via Direct Audio are not required to enter a passcode. Once connected a message will alert the user they are connected, and the connection box will disappear after a couple of seconds.